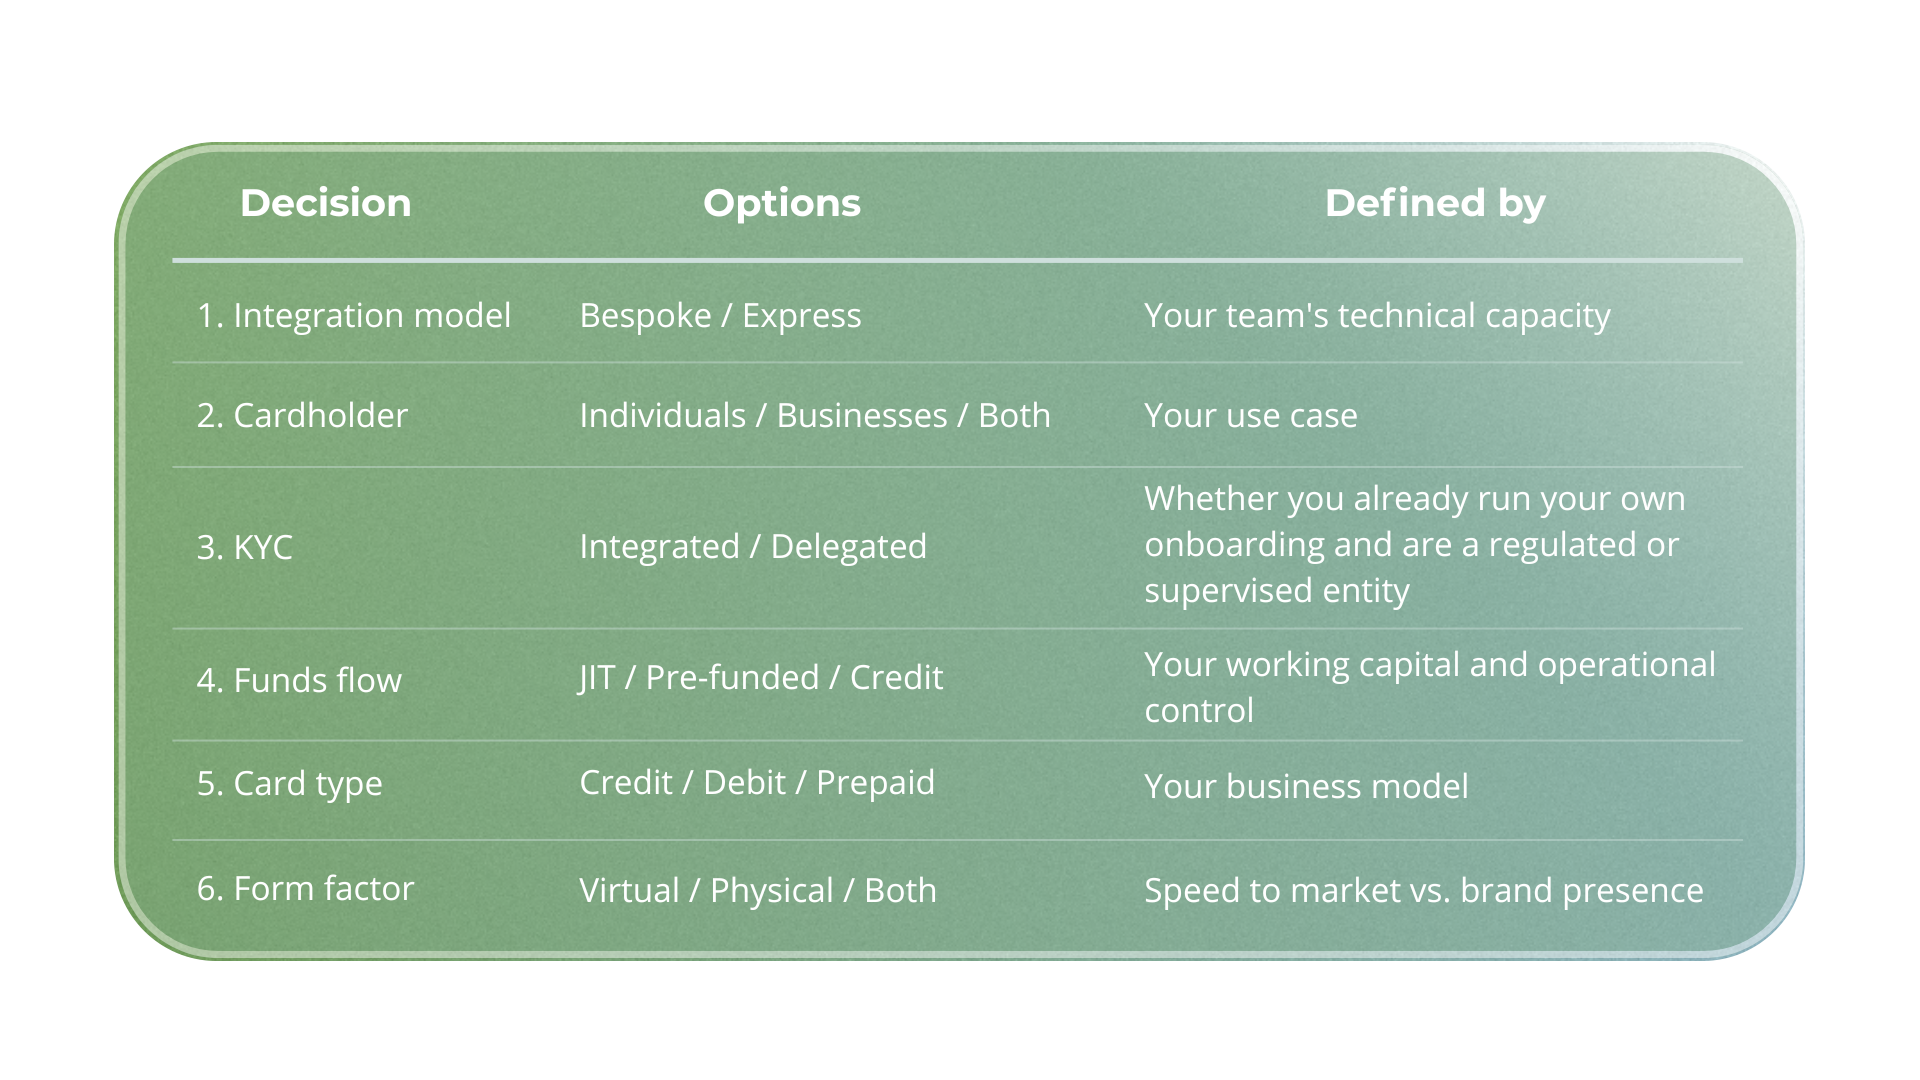
You can launch cards without holding a direct license. These are the 6 decisions that define your program, and how to make each one without losing weeks in the process.
You don't need to be a bank to issue cards
For years, issuing cards was territory reserved almost exclusively for banks and large institutions. Today, thanks to BIN Sponsorship and issuing-processing infrastructure, any fintech, cooperative/credit union, marketplace, payroll platform, remittance company, retailer, crypto platform, and even traditional financial institutions can launch their own card program without becoming a licensed member of the network or being a bank.
But "possible" does not mean "automatic." Behind every successful launch there is a series of configuration decisions that define how your program looks, operates, and scales. The good news is that it comes down to six key decisions and, once you have them clear, the rest is execution.
Step 1 — Choose your integration model
The first decision defines how much control (and how much technical effort) your team will have.
- Bespoke: integration via API. You build your own UX/UI and integrate the PayCaddy API to design the product exactly as you envision it.
- Express: whitelabel app and ready-to-use portal. Launch your branded program on a preconfigured app and portal, with no developers required.
How to choose: a fintech with its own engineering team and customization as part of its value proposition goes with Bespoke. A marketplace or retailer that wants to be in market within weeks, without writing a single line of code, goes with Express.
Step 2 — Choose your cardholder
Define who you will issue to. This decision impacts the onboarding flow and compliance requirements.
- Individuals: cards for consumers or individual employees.
- Businesses: cards for companies (e.g. corporate expenses, supplier payments, etc.).
- Both: if your product serves both segments.
How to choose: a corporate expense or B2B payments product targets businesses; a neobank or a remittance platform serving end consumers targets individuals. Defining this early avoids redesigning your onboarding later on.
Step 3 — Select your KYC validation
Every card program must comply with know-your-customer (KYC) processes. The question is who runs them.
- Integrated: PayCaddy captures and validates user data. It reduces your compliance burden.
- Delegated: you capture the data in your own flow and share it with PayCaddy. Useful if you already have your own onboarding. Reserved for institutions that are already regulated or supervised by a competent authority.
How to choose: if you don't want to build or maintain the KYC layer, the integrated model solves it for you. If you already have robust onboarding in place — for example a payroll platform that already verifies its employees' identity — the delegated model leverages it without duplicating work.
Step 4 — Define your funds flow
Here you decide how each transaction is financially backed. It is one of the most decisive choices for your liquidity and your operations.
- JIT (Just-in-Time): real-time authorization on your side, transaction by transaction, without using PayCaddy wallets.
- Pre-funded: funds are deposited in advance into a wallet under PayCaddy's infrastructure, and each purchase is deducted from that balance.
- Credit: you configure your credit products and wallets. Think of a revolving credit card.
How to choose: each model has a different impact on your technology flow, your treasury requirements, and your operational control. We cover this topic in depth in our next blog post.
Step 5 — Select the card type
Define the financial instrument you are issuing.
- Credit: the user spends against a granted credit line.
- Debit: the user spends against their own available balance. Usually reserved for deposit-taking institutions, such as banks and cooperatives/credit unions.
- Prepaid: the user spends against funds loaded in advance.
How to choose: it depends on your business model, the regulatory framework, and your capabilities as an entity.
Step 6 — Select the form factor
Finally, define the card's physical or digital format.
- Virtual: active immediately. Ideal for launching fast and for 100% digital use cases.
- Physical: available within 24 hours for delivery to your cardholders, with your brand's design.
- Both: combine the immediacy of virtual with the presence of physical.
How to choose: if speed is your priority and your product lives in an app, start with virtual. Many programs launch that way and add the physical card later, once the product is validated.
The 6 decisions at a glance